Character
Creation HOWTO
Table of Contents
1. Introduction
I'd like to meet the guy who invented beer, and
see what he's working on now.
1.1. Purpose of this
Document
This document describes how to create additional characters for
OpenMortal. The process is slow, painful, non-trivial and requires a lot
of work, so if you only have one free hour, you might as well quit now.
Then again, if you are dedicated and have the resources, you might find
that creating a character, and seeing it work in the game is in fact fun
and rewarding.
1.2. Intended Audience
This document is indended for people who want to create additional
characters for OpenMortal. It only cover the creation if natural characters, e.g. not
animated or rendered characters, but real people. You don't need to be
skilled in martial arts, expert in programming (although it
probably helps if you are both .. just kidding!).
1.3. Revision History
Revision
|
Date
|
Author
|
Description
|
1.
|
2003-09-28
|
UPi
|
Initial version. Describes the creation process
as of version 0.3 |
2.
|
2003-10-01
|
UPi
|
Finished the gimping part, added overview. |
3.
|
2003-10-03
|
UPi
|
Added sample gif.
|
1.4. Overview of the Process
- Get an idea of the character in your head.
- Set up the recording equipment, and record every move of the
character twice. Result: 5-10 minutes of DV video footage.
- Copy the video to a computer. Result: ~2-4 GB uncut video file.
- Cut the video file. Result: 60-90 seconds of cut video.
- Export the cut video at 1/2 frame rate (12.5 frame per sec for
PAL, 15 frame per sec for NTSC) as png. Result: 800-1200 png image files.
- Create the learning samples for Contour. Result:
learn_original.*.png and learn_foreground.*.png
- Run contour. Result: 800-1200 contoured and cropped png image
files and neural.log
- Import the files into The GIMP. Result: one xcf file with
800-1200 layers.
- Remove unnecessary layers, and do the labeling. Result: one xcf
file with 280-350 layers.
- Fix the images, align and retouch them.
- [Final steps are done by the OpenMortal team: converting to a DAT
file and coding]
1.5. Resources
2. Getting a Bright Idea
"Owl,
I have an idea", said Pooh.
"Nice, fat, clever bear you are", said Owl.
This might seem trivial at first, but before you start recording,
editing, processing, retouching, etc. a character, you have to create it
in your mind. Think about the character a bit.
What does he look like? OK, obviously he will will look like you or
someone you know... but does he think, act, move or behave the same?
What should the character wear? Some good outfit can greatly enhance
the character. Are there any other weapons and tools that he uses?
Think about the characters nature and demeanor. Is ha a good guy or a
bad guy? Or just plain confused? Can he actually do any martial arts, or
is this his first time in a fight?
How is the character different from the other characters already in
OpenMortal? Having a different backstory is cool, but is there something
in the character that actually makes him unique?
Finally, how does he move? How does he do his kicks, punches, and other
regular moves? What are the special moves of the character?
Once you know the answer to all these questions, you can move onto the
next phase.
3. Shooting a
Character
"He's
dead, Jim."
For the people of Texas: it does not
involve using a shotgun, and you should not attempt to involve one
either.
Shooting is perhaps the most techinally difficult part of the character
creation process. It's like always with content: garbage in - garbage
out. If you mess up the recording (e.g. by insufficient lighting, bad
camera settings or inadequate background) you will not be able to fix it
in later stages, and the character will be dead before he makes it
to his first fight.
3.1. Setting up
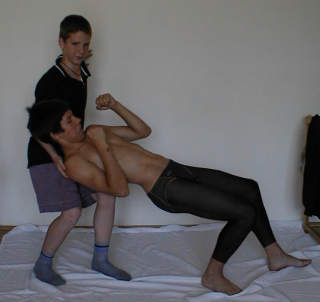 The first time I tried creating OpenMortal was
in 2000. Back then, I didn't have a digital camcorder, only a camera. So
we tried and tried to create characters from a large number of digital
still images. Then we tried some more. You can imagine how difficult it
was to do the falls.. Here's an image of a failed attempt of recording
the fall.. My soul still screams in terror when I remember those days.
Here you see several mistakes: The background is white, which meand
that the shadows (which are of course a dark shade of gray) are hard to
distinguish from the black parts of the character (the trunks and the
hair). The person helping is not covered with the background color. The
lighting is bad: the flash of the digital camera is reflecter right back
at the camera, making everything look dark backlit. All in all, this
attempt was quite terrible. I spent hours on retouching, re-editing,
color balancing, etc. about a 150+ photos. The results were
disappointingly low quality despite my best efforts.
Fast forward to 2002: I have come a long way. I got a digital
camcorder, proper lighting, some blue cloth for background. After some
playing around. I replaced the blue background with a green one. It
simply worked better. Here's how I set up the recording "studio":
![Recording setup [IMG: Recording setup]](images/recording.jpg)
The proper recording setup. This is how it looks from above.
The most important points are:
- There needs to be at least 4 meters of space for the actor.
- Mats: Put something soft on the ground. A mat or something
similar is best. Some of the moves, especially the "fall" and the
"thrown" moves require the actor to hit the ground. Now there are two
kinds of people as far as hitting the ground is concerned: "Judo
experts" and "others". If you happen to be one of the "others", you'll
be considerably less injured from falling if there is a mat under you to
fall on.
Don't make the mat too soft, because the actor will sink into it, and
it will appear as if he didn't have any feet.
- Green stuff: Use simple, green material to cover the
floor, the mats and the wall behind the actor. The material needs to be
light both in color and weight. You can attach it to the mats and the
wall either with sticky tape or with nails. If the material is in
multiple strips, it might be good to stitch or saw them together.
- Lighting: I used an 1500W video lamp. Regular indoor
lights will not do! Even though most modern cameras can "adjust"
to lower light conditions, the resulting image will be unclear, or
noisy, both of which are flaws which cannot be fixed later. You can use
multiple video lamps to eliminate some of the shadows. Mount the
video lamps on tripods!
- Shadows: Shadows are bad, because they make the contouring
harder later. To eliminate some of the shadows, you can use multiple
video lamps, or additional indoor lighting (don't expect much from
this). Also make sure that the actor doesn't stand right next to the
wall, but at least half a meter in front of it. This will lighten
the back shadows a bit.
- Camera: It should be right in the middle of the scene. If
you don't have enough space, use wide-angle lens, available for most
consumer MiniDV cameras. Mount the camera on a tripod and make sure that
it records the entire scene (some parts of the area surrounding the
green background will be used when the actor cannot keep it all inside.
This typically happends with falls.
Setting up takes some time. Calculate at least one hour for setting up,
and cleaning up after the recording.
3.2. Recording
Checklist
First of all, don't forget to warm up and stretch. Some of the moves
are difficult and you don't want to strain yourself.
Here is a list of the stuff that needs to be recorded:
- start: This is shown at the beginning of the fight. The
character prepares for the fight, or does something else funny that
introduces him. The move needs to end with the character in his
usual standing position! So, if the character starts facing the
camera, he must finish sideways (facing his imaginary opponent).
- stand: The character is not doing anything special, just standing.
This doesn't mean he is motionless: most characters are bobbing a bit,
jumping a bit, or some other ambient movement. Make sure the actor
remembers his standing position, as he must return to this position
after every move! One quite common mistake is to turn towards the
camera after a move. Don't do it. You must start every move from
this position, and return to this position after; otherwise the move
will not integrate into the flow of the game correctly. In fact, if you
don't start or finish a move in the standing position, it is best to
start it all over.
Sorry if this seems a bit repetitive.
- walk: Walk forward two full steps, then back. Repeat. If
you are short on space, then start from as far back as you can. Start
from your standing position, and return to it after this move.
- turn: Turn around. This is more complicated than it
sounds: you must turn so you are not with your back to the camera at the
end, instead, you should arrive into a standing position that is like
the mirror of your regular standing position!
- falling: This move is played back when the player is
uppercut, or falls for some other reason. Don't hurt yourself doing it,
though! You don't need to leap into the air like in the game. Just take
a step forward, assume your usual standing position, and let yourself
fall back. If there are some mats, you won't get hurt. You can use your
arms to break your fall, but it is less convincing that way. Also,
close your eyes at the end. This will help make you look more deadish.
- lay down: After falling down stay down for a moment.
Don't start getting up immediately. We need at least a few frames of
the character K.O.'d.
- get up: Easy. Just be sure to arrive to your usual
standing position after.
- hurt: This is not yet integrated into the game, but it
will be. It is now shown in the "Final Judgement" screen at the end of a
match. The character pretends to be dizzy, or otherwise injured. No
specific body part, just display a general air of great discomfort. In
the final game version, after a long combo, the character will be "hurt".
- won: This is used in two places: when the character is
chosen in the character selection screen, or when the character wins a
match (no surprise there, right?). Anything from a small victory dance
to a cool acknowledgement of the other's defeat is in order. Depends on
who you are. This is one of the few moves from which you don't
return to the standing position!
- block: The character is defending. Cover your face, turn
away, look scared, or anything, but don't move away. After
blocking the character should return to the same place he was before.
This is a game balance issue.
- crouching down: Go down to your knees or crouch. Don't use
your hands for support or balance. This sequence will also be used for
the jumps, and if you balance on your hand in the air it will be hardly
convincing!
- crouching: The character is crouching or kneeling. Some
movement is optional (some characters move in this position, some don't.
Up to you). This is the position that you need to return to after the
couching punch and crouching kick.
- crouching punch: Punch from your crouching or kneeling
position. This is also used for the jumpin punch.
- crouching kick: Kick from your crouching of kneeling
position. This move is also used for the jumpkick. One of the difficult
moves, it is easy to lose your balance if you are crouching on one leg.
You have have a friend support your back, but be sure that his arm is
wrapped in green (same color as the background), and that his hand
doesn't get between the camera and the actor.
- crouching punched: The character was hit (punched or
kicked) in the head while in a crouching position. This is not
used if you are in midair, so you can use the ground for support.
- crouching kicked: The character was hit (punched or
kicked) in the body while in a crouching position. See above.
- fun (something): When the character is idle for too long,
and gets bored, he might do something funny. You can have one or two
'fun' moves. You may not walk back or forward or make an attack while
having 'fun' as it would interfere with the game balance.
- threat (something): This is similar to the fun. You must
do one fun and one threat move for each character.
- high punch: Throw a punch to the head. Do not move forward
too much. Be creative, it can be a simple punch, a slap, or anything, as
long as you do it with your arm, and aim it at your opponent's head.
Compare this with the 'elbow' move.
- low punch: Punch to the body (chest of stomach). Do not
move forward too much.
- high kick: "High" means a kick either to the body or the
head. See how high you can get without losing your balance too much.
- low kick: A lick to the opponent's legs.
- groin kick: Well, you know. Evil, dirty, and yet quite
prominent in "America's Funniest Videos". Try to make it look different
from your other kicks..
- knee kick: The character will automatically do this move
instead of the high or low kicks when he is close to the opponent. It
doesn't need to be a knee kick as such, just a short-range attack with
your leg.
- elbow: This is done instead of the high punch when you are
close to your opponent. It doesn't need to be an attack with your elbow,
just a really short range attack (e.g. a headbutt will also do).
- spin: A spinning attack. It can be a spinning kick, a
spinning punch, a spinning slap, or, in some demented cases, a spinning
headbutt..
- leg sweep: Sweep his legs. You can use your legs (make it
different from the low kick!), or your hands too.. Or some other means..
- grenade: OK, so you don't actually throw a Shrapnel here.
This is a codename for any projectile attack. You don't need to actually
thrown an object, just pretending to 'cast' a magic fireball spell will
also do. Be creative.
- uppercut: Good old hard punch to the chin. (evil laughter)
Be sure to make a wide arc. You can overdo it.
- throw: This one is not implemented in the game yet, but
you need to record it anyway, because version 0.4 will see the light of
day, it will. Grab your opponent, and throw him over your head
and behind your back. You can turn too.
- high punched: You were hit in the head. Ouch. Make it look
like your head snaps back from the attack. Do not step back too much.
Again, you can make it a spectacular hurt move, of just a small thing,
depending on how much of a terminator your character is supposed to be.
- low punched: You were hit in the body.
- groin kicked: You poor sod. Unless you are female. Then
you can just laugh.
- leg hurt: This is not the same as fall! You were
just kicked in the legs, swept, or something like this. It is OK to
stumble, lose your balance, flail with your arms, or just bend your legs
a bit. Depends on your character.
- thrown: Your opponent has picked you up, and you are
thrown forward! Fall forward for this move, flailing!
- special moves: You make these up for your character. Use
your imagination. You can make 1-4 special moves. Any more is too much.
Most characters have 2 special moves.
3.3. More on Recording
It is a good idea to record many characters at the same time. It is
more fun, you can draw ideas from and encourage each other. On the great
recording session of 2002, we recorded 10 OpenMortal characters in one
shot!
Tips for the director:
- Try to make sure that the actor stays in front of the green area.
This is not always possible, though, so don't make this priority 1.
- Do every movement twice. During the editing phase you may
realize that you missed some error during recording, and it's good to
have a backup. Some moves are especially difficult, so it's good to have
two versions to choose from.
- Be patient with the actor. OK, this is how every book on
directing should start...
- Always make sure that the actor returns to his normal stance
after a move. If he doesn't, it's going to be hard to integrate the move
into flow of the game.
- Don't let the actor look at you or the camera. The actor should
look in the direction of the imaginary opponent.
- If the actor has difficulties with a move, ask someone to help
him! Use some extra green cloth to "mask" the other guy's presence. This
is also how you give "foreign objects" to the actor (e.g. weapons).
Tips for the actor:
- Stretch and warm up before the shooting.
- Don't lose your nerve. You can do it. It's hard, the video
lamp is burning your face off, and the director is asking you to do
impossible things, but it will be all over in 7 minutes.
- Don't look at the director or the camera. Keep looking
sideways, where your "opponent" should be.
- Try to imagine what your character would do, how your
character would think or react. Keep your moves simple but fun. Be
original.
- It is a good idea to do your moves slower than in real life.
This makes a number of moves easier. Don't worry: the playback speed
will be adjusted, it will appear normal.
Tips for the cameraman:
- Keep the damn camera steady. The zoom and camera position must
not change during recording. If the actor moves out of view, too bad,
but never change the camera! The actor should stay the same distance
from the camera at all times, so he appears the same height (in pixels)
in every frame.
- Keep your mouth shut unless you thing the actor has moved out of
the picture. In this case, tell the director, not the actor. Poor actor
has enough people barking orders at him as it is.
After the recording you will be left with a 5 to 10-minute DV footage
per character. The size of this thing is horribly large, in the order of
Gigabytes. The next steps ensure that it get smaller, and usable in the
game.
3.4. Sample Video
Since recording is THE most important part of the character creation, I
decided to include an example video
here. It is 3.4MB in size, and I have compressed it horribly, so
only download it if you want to learn the recording, because it will be
useless for anything else.
4. DV Editing
"Most editors are failed writers--but so are most
writers" - T.S. Eliot
 OK, so in the previous step you
produced the footage. It's large, full of recorded mistakes, and
interlaces - quite useless for the game. In this step you deinterlace
the footage, and remove the useless parts, leaving a cut version, which
should contain only the parts that you need.
4.1. Copying the
Video To Your Computer
Linux users: Transfer the footage from the camera to the
computer is usually painless. I used a program called dvgrab
which works from the command line, and does the job just fine. See the
documentation of dvgrab for details (e.g. kernel modules that need to be
loaded..)
Windows users: Usually the firewire/video editing card comes
with some software drivers and GUI programs that can grab from a DV
camera. Consult your hardware documentation.
4.2. Cutting the Video
Most nonlinear video editors (such as MainActor or kino)
can be used to splice the footage, and remove the useless parts. In the
previous step you recorded every move twice, now is the time to see
which one came out best, and remove the other. You may also remove
the second part of a move if it is the same as the first part,
played backwards. This saves some work later on.
After you're done editing, export the video into image files
(e.g. png format) at half framerate. The half framerate
for PAL cameras is 12.5 frames per second, for NTSC cameras it is 15. At
this point you end up with somewhere around 1000 pictures. Don't forget
to deinterlace the images, this should be a feature of any video
editor.
5. Using Contour
"I DO NOT HAVE A GUT! I have... contours." -
Frasier
OK, I'll start with the frankness. Contour sucks! It is hard to
use, the results are crappy and it is slow as hell.
Trouble is, I don't know of a better tool.
Here's what you have to do to make Contour work.
5.1. Creating
Learning Samples
The learning samples are, simply put, some pairs of images which are
designed to show Contour what is the foreground and what is the
background. Based on these learning samples, Contour will try to
extrapolate the rest of the images by itself.
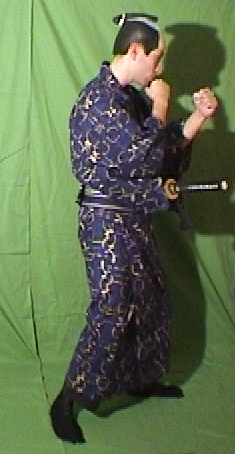
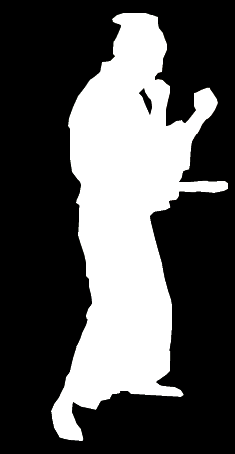
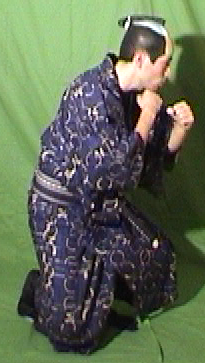
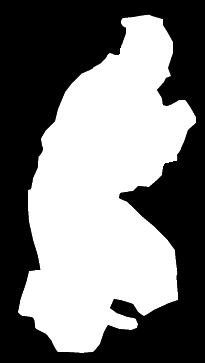
Each learning sample consists of two png images: one will be called learn_original.x.png,
the other learn_foreground.x.png. In these
filenames, x denotes an integer, starting from 0 up. The original
files are simply cut from one of the png files which were produced in
the previous phase. Only cut the important part of the file, do
not include too much useless background, and nothing from the
environment. The foreground file has to be the same dimensions as
the original file, but it has to be black and white: black marks the
background, white marks the foreground.
You need to create at least two such samples, which means at least four
files:
learn_original.0.png
learn_foreground.0.png
learn_original.1.png
learn_foreground.1.png
All of these files should be placed in the same directory as the 1000
png files. Here are example learning samples:
 |
 |
| learn_original.0.png |
learn_foreground.0.png |
|
|
| learn_original.1.png |
learn_foreground.1.png |
It is vital that the samples are of good quality. If you make the edges
too rough, Contour will actually learn to include parts of the
background or remove parts of the foreground! So strain your eyes, or
adjust the gamma of your display.
Try to choose a typical and an atypical sample. If the learning doesn't
work, you might need to choose some other images to learn from. It is
usually bad to use more than two learning samples.
5.2. Teaching and
Running Contour
So you have this directory with all the png files, the learning samples
and everything! Great!
Now you need to fire up Contour. First open the directory which
contains your files. Next, choose the "Create Neural Net" item
from the menu. A dialog such as this one will appear:
The learning process is extermely slow. It might take several minutes
until the result is acceptable.
Next you have to fine-tune some parameters: these parameters
are the treshold (from what level is the output considered
"foreground"), and some blurring (used for smoothing the contour).
Experiment to see what parameters work best with your images. Remember,
once you start the "Run Directory", these parameters will be used for
every image!
Once the learning is satisfactory, click on stop, and choose "Run
Directory" from the menu. Here you need to choose a "source"
directory (make it the same as the directory where the learning samples
and the png's are), and a destination directory (create an empty
directory for that). Click "Start". Once this is started it cannot
be stopped!
The neural network will run for every image in the source directory,
and produce a cropped output image in the destination directory.
6. Using The GIMP
"The Gimp is a very complicated program for users
and developers alike" - First sentence of the GIMP documentation.
The GIMP is the "GNU Image Manipulation Program", a free, extendable
and scriptable image editor (think "PhotoShop").
The objective of this phase is to further decrease the number of
images, and to "fix" those images that were messed up by Contour.
In order to complete all the steps that are required here, you will
need a copy of The GIMP, and also the Perl extensions to the GIMP, also
known as Gimp-Perl. The GIMP itself is available for Windows and Linux
(as well as many other UNIX-like operating systems), however the
Gimp-Perl is only available for Linux. This will be a problem for
Windows users in step 6.1.
The GIMP can be downloaded from http://gimp.org/download.html
for Linux, or http://www2.arnes.si/~sopjsimo/gimp/#download
for Windows. The GIMP and Gimp-Perl are now part of most recent Linux
distributions, so you can probably install it from your CD's or get the
package from your distribution's local mirror. For tutorials about The
GIMP, see this page.
Before you continue:
- Your computer will need a lot of RAM to process all the
1000 images. 512MB is the bare minimum.
- In the GIMP, set the Tile Cache Size to as large as you
can. E.g. if you have 512MB of RAM, set it to 450MB.
6.1. Using The GIMP
Although introductions and tutorials for The GIMP are abundant, and
some of them are quite well-written, I will nonetheless venture to write
a short guide here. I will specialize on GIMP functions that are the
most useful for creators of OpenMortal characters.
Loading and saving. The GIMP's native file format is called xcf.
While you work, you will need to save your image as an xcf file. Saving
in other formats will cause the loss of information (e.g. layers). Under
linux, you can save the file compressed by specifying an .xcf.bz2 or an
.xcf.gz extension. Compression can take a while on slower computers, but
can save some disk space. (Actually I am told that you can save as
.xcf.gz on Windows if you have a program called Minigzip installed)
Although recent version of The GIMP are quite stable, you are encourage
do save your work often.
Keyboard accelerators. Most operations in the gimp are invoked
by pressing the right mouse button inside the image window and thus
invoking the image menu. However,you can assign a keystroke
to any menu item, by hovering the mouse over a menu item, and
pressing the keys. Keystrokes can be single keys (e.g. A, or F1),
or a combination (Ctrl+Shift+A). It saves a lot of time to
customize keystrokes to suit your needs. The combinations that I use
most often are:
![Layers in the GIMP [IMG: Layers in the GIMP]](images/gimp_layers.jpg)
- Ctrl+S: Save current image. (File menu of an image)
- Ctrl+Z: Undo (use it if you made a mistake. By default you can
undo the last 5 steps, but you can change this in the Preferences menu)
- Ctrl+Shift+A: Clear selection. (Selection menu of an image)
- R: Rectangular selection
- F: Freehand selection
- A: Alpha to selection (I customized this one, you find it in the
Layers menu of an image)
- Shift+E: Eraser (Tools / Paint Tools menu)
- M: Move (Tools / Transform menu)
- Ctrl+X: Delete current layer (works both on the Layers window and
the image window)
- Shift+C: Crop (Tools/Transform menu)
Working with layers. Layers provide much of The GIMP's power and
flexibility. They can be combined in many ways to create a composite
image. The Layers window can be opened by pressing Ctrl+L in the image
window. One thing that is not so intuitive about working with layers is
that the visible layer is not always the active layer.
- The active layer is highlighted in the layers list. Every
drawing action (e.g. erasing, filling, brushes, etc) is carried out on
the active layer. If you don't see the result of something you do, that
might be because the active layer is currently not visible. (There
could be other reasons, but this one is the most common.) You
can choose the active layer by clicking on the name of any layer in the
layer list.
- There can be many layers visible at the same time. Layers
which are visible have a small eye icon to the left of them.
- Clicking on the eye (or the place of the eye) will toggle the
visibility of the layer.
- Shift+clicking at the eye will make that layer the only layer
visible.
- Shift+clicking at the eye again will make every layer visible
(messy!).
6.2. Importing the
png Images Into The GIMP
So, you made it this far. You have the GIMP, you have Gimp-Perl (or
maybe you don't - Windows users read below), and you have ran
Contour for all your 1000 png files. Excellent!
Contour has created, along with the output png files, a data file
called contour.log. I have written a small Gimp-Perl script
which will read this log, read the image files, and put them in one huge
GIMP image. This script can be downloaded from here. The script must be copied into
your gimp plugin directory (this is set when you install the gimp).
Install the script (you will need to restart The GIMP if it was already
running), and start it from "Xtns/Perl-Fu/Mortal load". Enter the
path to the directory where the contoured images and contour.log reside.
After a lot of waiting, a new window will appear. It will be
empty. Don't panic! If you open the Layers dialog, you will see that it
holds all your precious images, each in it's own layer, but none of them
are visible by default.
6.3. Removing
Unnecessary Layers and Labeling Moves
First thing to do once you have importad the image is to save it. This
will take a while, given the size and number of layers.
Once this is done, you can start the first and most important job:
removing unnecessary layers and labeling them correctly. This is
important for many reasons: it will save disk space, memory and download
time for gamers, it will save you time (you won't have to fix and
retouch so many layers), and it will make integrating the character into
the game easier.
- You need to remove layers which are not part of the any move
(in theory you could've done this while editing the video, but
nevertheless there will be a few dozen or maybe even hundred off
frames).
- Even frames which are part of a move are not always necessary: if
two adjacent layers look similar remove one with extreme prejudice.
You can even remove two out of three frames on especially slow or
unimportant parts, it is up to you.
- Also, of there are some moves where the second part is the
same or similar as the first, played backwards. Usually kicks,
punches, blocking etc. are like this. In this case you can remove the entire
second part of the move, saving a large amount of space!
- You can rename a layer by double-clicking the name. Do this to
mark the first layer of every move as such (see below for more about
this).
Once you are done removing these unwanted frames, you should be down
from the initial 1000-1300 frames to around 300-350.
Here is a table which shows the number of layers each current
OpenMortal character uses. When creating new characters, try to make the
number of layers similar to these values. In particular, kneeling
(referred to as "crouching" earlier in this document) should always
be 4 layers, because it is used by the jumping algorithm. If a move of
your characters is particularly simple, make it fewer layers, if it is
long and overdone, you can use more.
| |
Zoli |
UPi |
Cumi |
Sirpi |
Ulmar |
Maci |
Bence |
Descant |
Grizli |
| start |
21 |
18 |
18 |
20 |
30 |
23 |
23 |
13 |
14 |
| stand |
4 |
5 |
4 |
7 |
6 |
5 |
4 |
4 |
6 |
| walk |
13 |
14 |
14 |
13 |
12 |
14 |
12 |
10 |
15 |
| turn |
9 |
8 |
8 |
9 |
8 |
9 |
8 |
9 |
9 |
| falling |
11 |
17 |
12 |
14 |
14 |
12 |
18 |
16 |
15 |
| laying |
1 |
1 |
1 |
1 |
1 |
1 |
1 |
1 |
1 |
| getup |
14 |
16 |
19 |
16 |
20 |
18 |
12 |
15 |
16 |
| hurt |
16 |
12 |
9 |
13 |
13 |
13 |
8 |
7 |
9 |
| swept |
6 |
6 |
6 |
13 |
9 |
8 |
8 |
10 |
16 |
| won |
11 |
19 |
26 |
10 |
14 |
17 |
8 |
20 |
20 |
| block |
5 |
5 |
4 |
5 |
6 |
5 |
5 |
5 |
6 |
| kneeling |
4 |
4 |
4 |
4 |
4 |
4 |
4 |
4 |
4 |
| onknees |
1 |
4 |
1 |
4 |
4 |
4 |
4 |
4 |
5 |
| kneelingpunch |
7 |
5 |
4 |
5 |
6 |
5 |
5 |
5 |
5 |
| kneelingkick |
4 |
5 |
5 |
6 |
5 |
6 |
- |
5 |
5 |
| fun |
7 |
5 |
7 |
8 |
7 |
9 |
5 |
13 |
9 |
| threat |
9 |
6 |
6 |
9 |
5 |
8 |
6 |
7 |
12 |
| highpunch |
5 |
4 |
4 |
5 |
11 |
5 |
6 |
5 |
9 |
| lowpunch |
6 |
6 |
5 |
6 |
10 |
6 |
5 |
6 |
6 |
| highkick |
8 |
6 |
6 |
7 |
6 |
7 |
7 |
7 |
6 |
| lowkick |
6 |
5 |
6 |
6 |
6 |
6 |
6 |
6 |
6 |
| groinkick |
6 |
6 |
6 |
7 |
7 |
10 |
6 |
6 |
7 |
| kneekick |
6 |
7 |
6 |
7 |
7 |
7 |
6 |
6 |
8 |
| elbow |
5 |
7 |
5 |
6 |
7 |
6 |
7 |
5 |
12 |
| spin |
11 |
10 |
- |
14 |
11 |
11 |
10 |
- |
17 |
| grenade |
15 |
18 |
7 |
9 |
10 |
10 |
11 |
10 |
10 |
| uppercut |
9 |
8 |
8 |
8 |
9 |
8 |
7 |
7 |
17 |
| throw |
16 |
15 |
24 |
22 |
34 |
15 |
22 |
23 |
19 |
| highpunched |
9 |
6 |
5 |
5 |
6 |
8 |
5 |
5 |
11 |
| lowpunched |
4 |
5 |
5 |
5 |
7 |
6 |
6 |
6 |
6 |
| groinkicked |
13 |
19 |
17 |
9 |
8 |
14 |
8 |
9 |
8 |
| kneelingpunched |
4 |
4 |
4 |
4 |
5 |
8 |
4 |
5 |
5 |
| kneelingkicked |
3 |
7 |
5 |
6 |
6 |
6 |
5 |
5 |
4 |
| thrown |
4 |
13 |
7 |
14 |
10 |
12 |
8 |
8 |
14 |
| specpunch |
13 |
- |
27 |
13 |
- |
- |
14 |
19 |
6 |
| funb |
- |
3 |
- |
12 |
- |
- |
- |
11 |
- |
| sweep |
- |
7 |
14 |
9 |
10 |
8 |
7 |
11 |
15 |
| cranekick |
- |
9 |
- |
- |
- |
- |
- |
- |
- |
| burninghands |
- |
13 |
- |
- |
- |
- |
- |
- |
- |
| kneelingfire |
- |
12 |
- |
- |
- |
- |
- |
- |
- |
| spit |
- |
- |
5 |
- |
- |
- |
- |
- |
- |
| junk |
- |
- |
- |
- |
1 |
- |
- |
- |
- |
| junkb |
- |
- |
- |
- |
1 |
- |
- |
- |
- |
| specsomething |
- |
- |
- |
- |
9 |
- |
- |
- |
- |
| scissorkick |
- |
- |
- |
- |
- |
15 |
- |
- |
- |
| pierce |
- |
- |
- |
- |
- |
- |
8 |
- |
- |
| knife |
- |
- |
- |
- |
- |
- |
- |
17 |
- |
| hipshot |
- |
- |
- |
- |
- |
- |
- |
9 |
- |
| nunchaku |
- |
- |
- |
- |
- |
- |
- |
- |
15 |
| stomp |
- |
- |
- |
- |
- |
- |
- |
- |
11 |
| Total |
286 |
340 |
314 |
331 |
345 |
329 |
289 |
334 |
379 |
While you are removing the unwanted layers, label the layers.
This means that for the first layer of every move, rename it to match
the name of the move. You can see on the screenshot at the beginning of
this chapter, how this was done for STAND and WALK in Grizli's case.
Please use the names in this table (make up names for unique special
moves).
6.4. Fixing Bad
Contours
Every now and then, Contour will mess up. It might be that the picture
is too dark or blurred in certain places, or something else that messes
up the detection, but it will happen, and will happen a lot. To fix the
mistakes of contour, you can use these tools:
- Use the Eraser (Shift+E) tool to remove pieces of the
background that were not removed by Contour. The eraser's shape and size
is always that of the current brush, and the default brush in GIMP is
huge. Choose a smaller round brush, and you can do erasing pretty well.
Zooming in (using the '=' key, zoom out with the '-' key)
also helps. If you make a mistake, you can undo it with Ctrl+Z, or with
the anti-eraser (see below).
- Use the Anti-eraser add parts to the foreground that were
removed by Contour. You can do this by selecting the Eraser tool, and
pressing the Ctrl key while you click and drag the mouse. The comments
about brushes and zooming above apply to the anti-eraser as well.
- Sometimes the detection can't determine the position of the
characters within the background. These will be degenerate frames where
the entire image is included. This happens a lot when the actor isn't
entirely behind the green material. If this happens, the following steps
must be taken:
- Using the freehand selection tool (F key), select the
character roughly.
- Activate the crop tool (Shift+C), and choose "Current
layer only". Click within the selection, then from the new window click
on "From selection" and then "Crop".
- Finish cleaning up the frame with the eraser (and anti-eraser)
Fixing and cleaning up 300-or-so frames is time consuming, but the
result will be much nicer. Even if you don't use the eraser to fix the
frames, you must fix the degenerate frames.
6.5. Aligning The
Images
This simply means that the layers should be shifted in a way that the
character will start every move from the same origo. Every move should
be aligned to the start move (or the onknees move in case
of the kneeling punch and kneeling kick).
To move a group of layers together, you need to click just right of the
"eye" icon on every layer. Another icon (four arrows) will appear, and
this means that the layer is now grouped. If you move any layer with the
move tool (M key), the grouped layers will move with it. So, if
you group every layer of a move, you can move and align them together
(layers within the move will be properly aligned by Contour).
 The best
way to align the images is to
- Make the first frame of the STAND move visible.
- Then you view the rest of the moves one by one, and make sure
that each starts at the correct position. They do not need to end
at the same position of course (e.g. walking forward will naturally end
much further to the right).
- If the move is not aligned with the STAND (best way to measure is
checking the position of the feet and the head), they need to be grouped
together, moved to the correct location, and ungrouped.
For example, in this image, the "HIGH KICK" is not aligned with the
standing position (shown in the background.) The images which belong to
the high kick are already grouped together (observe the arrows icon next
to the eye icons), and ready to be moved to the left, and a bit down.
The following moves do not need to start at the START position:
- onknees: needs to start at the end of the kneeling
move.
- kneelingpunch and kneelingkick: needs to start at
the beginning of onknees move.
- laying: needs to be aligned with the end of the falling
move.
- getup: needs to be aligned with the laying move.
- start: the end of the start move needs to be
aligned with the beginning of the stand move. (Naturally!)
6.6. Adding Special
Effects
The GIMP offers a huge array of filters and other transformations that
you can apply to the poor character. Here are some ideas:
- Draw wings or horns on him.
- Color him to a red-yellow gradient.
- Bump map him with a sponge-like patter to make it look like he's
an alien with pores.
- Apply the unsharp mask to enhance the contrast and make him look
stronger.
- Oilify the character to make him look like a painting.
The list goes on... Before you add any special effects, make sure to make
a copy of the original! It is not nevessary to add special effects
to a character to make him interesting. Since OpenMortal features real
people, the idea is to make each character unique and original by making
their demeanor different from the rest.
Also be aware of the "Filter all layers" menu at the top of the
Filters menu... You can check the animation with the Filter/Animation/Playback
menu item.
6.7. Saving the Result
Once you are done with all this stuff, save the xcf file. The rest of
the steps should not be saved into the xcf file as they
are not reversable and result in some loss of the original content. If
you need to change the character later, you will need the xcf file
intact, and replay the following steps:
- In the Preferences dialog, set the Scaling method
(available in the Environment group) to Cubic.
- Scale the entire image (via the Image/Scale Image menu
item) so that the standing character is 300 pixels tall. If you
kept the camera steady during the recording, the character will appear
300 pixels tall for every frame.
- Change the image's mode to indexed (via the Image/Mode/Indexedmenu
item). Set the number of color to 63. the algorithm to "Floyd-Steinberg
(normal) and disable the dithering of transparency.
- Save the image as a gif file with the File/Save as menu. Do
not overwrite the xcf file!!! The gif exporter will ask if you want
to merge the visible layers or save your character as an animation
(naturally), and whether frame disposal should be cumilative or 1
frame/layer.
You are DONE!! The result is a gif file which is about 3MB in size. You
can watch it by opening it in a web browser.
Here is an example of what the result
should look like.
7. Where Do You Go
From Here?
You've Come A Long Way, Baby - Fatboy Slim
So you have successfully created a character's animation! And you only
had to work on it for hours! So what now?
Answer is, the rest of the process is even more complicated and less
intuitive than it has been so far. It involves using the MortalEditor to
mark the head, torso and legs of each frame (a semi-automated process),
check the hits, and create some code which makes the character work
inside the game. If you want to do it yourself - fine, there are enough
examples (the rest of the characters) to learn how to do it. But you
shouldn't have to.
For now, your work is finished. You need to send me the gif file, along
with a description of the character (name, age, etc., and what his
special moves are supposed to work like). I will add the character to
the game, and return it to you, ready to be played. To send me the
character, please go to the Character Upload Page.
If you have questions or comments regarding this documentation or the
character creation procedure, please feel invited to ask for help at the OpenMortal
Help Forum.
![Recording setup [IMG: Recording setup]](images/recording.jpg)
 The first time I tried creating OpenMortal was
in 2000. Back then, I didn't have a digital camcorder, only a camera. So
we tried and tried to create characters from a large number of digital
still images. Then we tried some more. You can imagine how difficult it
was to do the falls.. Here's an image of a failed attempt of recording
the fall.. My soul still screams in terror when I remember those days.
The first time I tried creating OpenMortal was
in 2000. Back then, I didn't have a digital camcorder, only a camera. So
we tried and tried to create characters from a large number of digital
still images. Then we tried some more. You can imagine how difficult it
was to do the falls.. Here's an image of a failed attempt of recording
the fall.. My soul still screams in terror when I remember those days.![Recording setup [IMG: Recording setup]](images/recording.jpg)
 OK, so in the previous step you
produced the footage. It's large, full of recorded mistakes, and
interlaces - quite useless for the game. In this step you deinterlace
the footage, and remove the useless parts, leaving a cut version, which
should contain only the parts that you need.


![The learning dialog [IMG: The learning dialog]](images/contour_learning.jpg)
![Contour is running. [IMG: Contour is running.]](images/contour_running.jpg)
![Layers in the GIMP [IMG: Layers in the GIMP]](images/gimp_layers.jpg)
 The best
way to align the images is to