The Making of Mortál Szombat!!
The making of an OpenMortal character is a lot of work. Here I try to outline the process.
1. Shooting
 Shooting is the first
step of character creation. You need at least three people to properly
do it: one actor, one cameraman and a director. The cameraman's
job is to keep the camera focused on the actor, and make sure that the
actor doesn't accidentally get out of the picture. The director
keeps a list of moves that the actor must perform, and always tells the
actor what to do next. The actor then tries her/his best to
perform everything as his 'character' would do it.
Shooting is the first
step of character creation. You need at least three people to properly
do it: one actor, one cameraman and a director. The cameraman's
job is to keep the camera focused on the actor, and make sure that the
actor doesn't accidentally get out of the picture. The director
keeps a list of moves that the actor must perform, and always tells the
actor what to do next. The actor then tries her/his best to
perform everything as his 'character' would do it.Equipment consists of:
- One MiniDV video camera (we used a Sony PC9 camera, it worked well, others are probably just as good)
- One video lamp (ours is a 1500W model.. very bright, almost painfully so, but it greatly improves the quality of the footage).
- Some green textile to cover the wall and ground surrounding the actor. This makes it possible later to remove the background automatically. Other colors (e.g. blue) would also work. This is a home-made 'green box'. It's not as good as the industrial green boxes used in feature films, but for an amateur game it will do.
- Large quantities of drinks and snacks. Everyone will be thirsty
and hungry after his/her turn in front of the camera.
| Recording checklist | |
| start stand walk turn falling lay down get up hurt leg swept won block kneeling on knees kneeling punch kneeling kick kneeling punched kneeling kicked fun (something) |
threat high punch low punch high kick low kick groin kick knee kick elbow spin leg sweep grenade uppercut throw high punched low punched groin kicked thrown special moves |
- Try to make sure that the actor stays in front of the green area. This is not always possible, though, so don't make this priority 1.
- Do every movement twice. During the editing phase you may realize that you missed some error during recording, and it's good to have a backup. Some moves are especially difficult, so it's good to have two versions to choose from.
- Be patient with the actor. OK, this is how every book on directing should start...
- Always make sure that the actor returns to his normal stance after a move. If he doesn't, it's going to be hard to integrate the move into flow of the game.
- Don't let the actor look at you or the camera. The actor should look in the direction of the imaginary opponent.
- If the actor has difficulties with a move, ask someone to help
him! Use some extra green cloth to "mask" the other guy's presence. This
is also how you give "foreign objects" to the actor (e.g. weapons).
- Stretch and warm up before the shooting.
- Don't lose your nerve. You can do it. It's hard, the video lamp is burning your face off, and the director is asking you to do impossible things, but it will be all over in 7 minutes.
- Don't look at the director or the camera. Keep looking sideways, where your "opponent" should be.
- Try to imagine what your character would do, how your character would think or react. Keep your moves simple but fun. Be original.
- It is a good idea to do your moves slower than in real life.
This makes a number of moves easier. Don't worry: the playback speed
will be adjusted, it will appear normal.
- Keep the damn camera steady. Keep your mouth shut unless you
thing the actor has moved out of the picture. In this case, tell the
director, not the actor. Poor actor has enough people barking orders at
him as it is.
2. Video Editing
 OK, so in the previous step you produced the footage.
It's large, full of recorded mistakes, and interlaces - quite useless
for the game. In this step you deinterlace the footage, and remove the
useless parts, leaving a cut version, which should contain only the
parts that you need.
OK, so in the previous step you produced the footage.
It's large, full of recorded mistakes, and interlaces - quite useless
for the game. In this step you deinterlace the footage, and remove the
useless parts, leaving a cut version, which should contain only the
parts that you need.Transfer the footage from the camera to the computer is usually painless. I used a program called dvgrab which works from the command line, and does the job just fine. I hear there are gui programs for Windows that accomplish this task as well, and I tried some too, but they didn't work without problems such as frame dropping.
Most nonlinear video editors (such as MainActor or kino) can be used to splice the footage, and remove the useless parts. In the previous step you recorded every move twice, now is the time to see which one came out best, and remove the other. You may also remove the second part of a move if it is the same as the first part, played backwards. This saves some work later on.
After you're done editing, export the video into image files (e.g. png format) at half framerate. The half framerate for PAL cameras is 12.5 frames per second, for NTSC cameras it is 15. At this point you end up with somewhere around 1000 pictures. Don't forget to deinterlace the images, this should be a feature of any video editor.
3. Background Removal
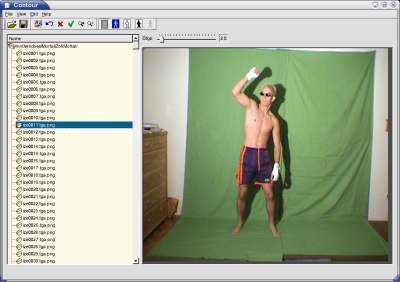
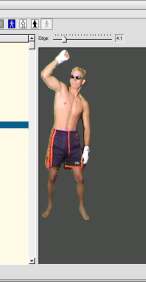
OK, now we have a lot of images, but these images are large (the DV resolution is 720 * something), and contain the background and other unwanted elements. Here's my contour program, removing them:
![Probabilistic version [IMG] Probabilistic version](http://openmortal.sourceforge.net/images/contour2.jpg)

Contour executes for the entire directory, producing a number of cropped and background removed images. In the unfortunate event that the actor was not entirely in front of the green part, cropping is not possible, but background removal is done anyway.
4. Gimping
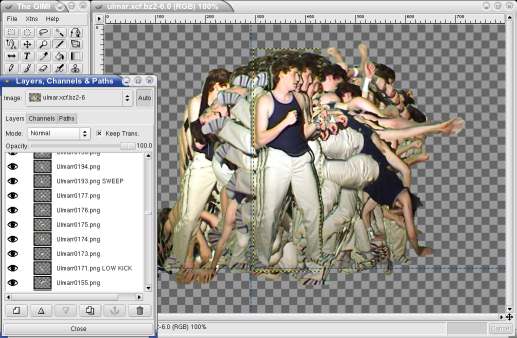
 This is a
long and tedious part of the character creation. All the contour'ed
images are loaded into a multi-layer gimp file.
 - Layers that are too similar are removed.
- If the second part of the movement is the same as the first part, backwards, then the second part is removed.
- Corrections to the background removal are made.
- The layers are named according to their content.
- The whole thing is resized: the character's height in the game is 300 pixels. The recorded height is ideally a little bigger (around 400 pixels).
- The file is saved as an animated gif, and imported into a Mortal Szombat .DAT file.
5. Outline Detection
 Now the last thing to do is to mark the character's
head, body, and leg. There's a handly little utility to do most of the
work automatically, as shown in this image.
Now the last thing to do is to mark the character's
head, body, and leg. There's a handly little utility to do most of the
work automatically, as shown in this image.Red marks the head area, green the body and blue the legs. The yellow part is the "arrack", if there is one for the current frame. In the game an attack hits if the yellow part intersects the opponent's red, green or blue part.


